The CNC Phono Stage DIY

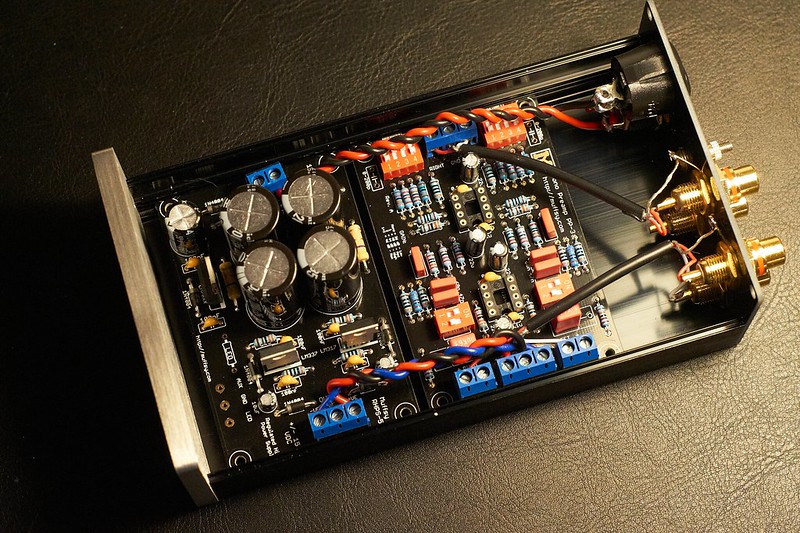
Darren has mentioned the CNC DIY phono stage in

http://www.psaudio.com/article/cnc-moving-magnet-cartridge-phono-stage-part-2/ and http://www.psaudio.com/article/39395/

Once the printed wiring boards (PWBs) are available you can go to the DigiKey cart that Darren has set up to buy parts here: http://www.digikey.com/short/35wh82

There’s an entire thread at AudioKarma.org, replete with over 133 pages, that discuss the CNC phono stage. But here’s a link to the page showing the boards that Darren is arranging to get for us: http://audiokarma.org/forums/index.php?threads/another-super-high-end-phono-stage-no-expense-spared.371889/page-119

I’ve arranged to buy my resistors from partsconnexion.com, as they have the PRP resistors that Paul uses in the PWD and DS, (well, and just about everything else) The OPA 2134 op-amps are about a buck cheaper per unit at partsconnexion than DigiKey. Well, once they come from their vendor, that is, as they’re back-ordered.

Here are the part numbers for the PRPs:

2 PRP Resistor_50009 100R / 0.25 (1/4) Watt, Metal Film, 1%, 100ppm, Non-Magnetic, Each PRP-50009 $0.35 $0.70
2 PRP Resistor_76660 130R / 0.25 (1/4) Watt, Metal Film, 1%, 100ppm, Non-Magnetic, Each PRP-76660 $0.35 $0.70
2 PRP Resistor_53791 180R / 0.25 (1/4) Watt, Metal Film, 1%, 100ppm, Non-Magnetic, Each PRP-53791 $0.35 $0.70
4 PRP Resistor_76663 300R / 0.25 (1/4) Watt, Metal Film, 1%, 100ppm, Non-Magnetic, Each PRP-76663 $0.35 $1.40
4 PRP Resistor_53813 2K2 / 0.25 (1/4) Watt, Metal Film, 1%, 100ppm, Non-Magnetic, Each PRP-53813 $0.35 $1.40
4 PRP Resistor_53818 3K3 // 0.25 (1/4) Watt, Metal Film, 1%, 100ppm, Non-Magnetic, Each PRP-53818 $0.35 $1.40
2 PRP Resistor_76679 16K / 0.25 (1/4) Watt, Metal Film, 1%, 100ppm, Non-Magnetic, Each PRP-76679 $0.35 $0.70
2 PRP Resistor_70511 33K / 0.25 (1/4) Watt, Metal Film, 1%, 100ppm, Non-Magnetic, Each PRP-70511 $0.35 $0.70
2 PRP Resistor_70826 82K / 0.25 (1/4) Watt, Metal Film, 1%, 100ppm, Non-Magnetic, Each PRP-70826 $0.35 $0.70
4 PRP Resistor_76687 110K / 0.25 (1/4) Watt, Metal Film, 1%, 100ppm, Non-Magnetic, Each PRP-76687 $0.35 $1.40
2 PRP Resistor_70051 150K / 0.25 (1/4) Watt, Metal Film, 1%, 100ppm, Non-Magnetic, Each PRP-70051 $0.35 $0.70

I will most likely use a pair of the AA battery holders ( https://www.jameco.com/webapp/wcs/stores/servlet/ProductDisplay?storeId=10001&langId=-1&catalogId=10001&productId=2207021 ) and plug them into jacks on the housing for easy access to change batteries. https://www.jameco.com/webapp/wcs/stores/servlet/ProductDisplay?storeId=10001&langId=-1&catalogId=10001&productId=151555 (I always hated the 9V snap clip as it can lead to reverse power if one is not careful. Besides, the AA will last longer. I hope.)

So, while I’m waiting for parts and boards I dug out my old turntable I bought 30 years ago and discovered the Grace F8 cartridge I bought is no longer made. After some searching, there is a replacement needle I can buy for it that will fit (was meant for a Shure, but it apparently works for the F8)

So, looking at the turntable (with its built-in interconnects) and a cartridge that no one knows anything about, what values do I use for the load resistors and capacitors on the front end?

(see next post, as this one is getting rather long)

OK, here’s where things get interesting:

Tuning the front end of a phono stage.

I used these two websites as my reference:

http://www.hagtech.com/loading.html

http://sound.whsites.net/articles/cartridge-loading.html

From there we see that the capacitance of the interconnect wires and inductance of the phono stage itself are key to proper tuning of the front end. As many of the phono cartridges are different, it’s crucial we get this right.

First, I measured the capacitance of the interconnects with my capacitance meter kit (got mine from: https://www.sparkfun.com/products/9485 ) Now when I got that, I also got, completely on a whim, a signal generator kit ( https://www.sparkfun.com/products/11394 ) I mean, you never know when you need a triangle wave, right? (Oh, by the way, if you get one, make sure you solder the switch buttons flat on the PWB, otherwise the buttons will physically stick on the cover plate)

OK, so the capacitance meter indication was bouncing around quite a bit, but it did seem to center around 100 pF. OK, that’s a good starting point. Now, how do we measure the coil’s inductance? Well, it turns out, that’s where the signal generator comes in. Set the signal generator at 10 Hz with a 1V RMS signal (2.7 V peak-to-peak) per the procedure in the second link, and connect to one channel of the cartridge (hopefully they’re both the same). Measure the voltage across the coil. In the case of the Grace, I measured 22 mV. Now, increase the frequency of the signal generator until the voltage measurement increases by the 3 dB (in my case up to 31.1 mV). Write down this frequency. (for the Grace, this was 450 Hz) Disconnect the signal generator and measure the resistance of the coil. Using the formula in the second link, we find the inductance is equal to the XL ( in this case the resistance measured) divided by the quantity ( 2 pi times the frequency measured at the 3 dB point). In my case the Grace inductance was 231 mH.

So now that we know the inductance and the capacitance, we go back to the first link and plug these values into the calculator, and we get the resonant frequency of 33 kHz for the cartridge system, which means the optimum resistor value would be 48k ohm for the 231 mH and 100 pF.

So, after all that, in my case the optimum load setting is no capacitance and use the 47 k ohm switch position on the input, and I should be good to go.

Streets Still Works - Thanks so much for your attention to this project!

For those who are interested in boards: we have been delayed 1-2 weeks due to the carrier losing the package during the holiday rush. We greatly apologize about the delay. This phonostage is worth the wait and sounds excellent. I’ll also follow up in the near future with a simple MC step up for those who want to run low output MC’s.

-Darren

Here are the equivalent resistor values based on which input switch is placed in the ‘on’ posistion

Switch in 'on' position Resistance Value (ohm)
1,2,3,4 17165.694
1,2,3 19383.9542
1,2,4 20339.7474
1,2 23530.4348
1,3 25384.6154
1,4 27049.1803
1 33000
2,3,4 35774.7224
2,3 46979.1667
2,4 53017.2414
3.4 63461.5385
2 82000
3 110000
4 150000
1 Like

I guess there aren’t many folks interested in vinyl . . . . .

I am and I thank the two of you for keeping this thread alive. I’m definitely interested in getting a board and building up a nice little amp.

-Pb

Darren, can the CNC run on 2 12V batteries without voltage regulators? I know the OPA 2134 can, but I’m not sure of the other.

I was thinking of using 2 small lead-acid batteries and, when the phono stage is off, use a small motorcycle charger/desulphator to trickle charge the batteries.

12V batteries will be fine to use, they will allow the stage to have more headroom and could very well be an audible improvement over 9V’s.

Darren Myers said 12V batteries will be fine to use, they will allow the stage to have more headroom and could very well be an audible improvement over 9V's.
Darren, thanks, that actually makes my life a lot easier.

Oh, and I realized something else: for those that want to measure the inductance of their cartridges by the method listed above but who don’t have a function generator or want to spend $50 to get the kit, then you can buy an app for your smartphone that will do what you need for a few bucks. Darren, we may want to do some research on them and make suggestions for the ones that are the most useful for this application.

Then, hopefully, we can create a database of everyone’s measurements and list inductance for each model number so they don’t have to do the test themselves.

–SSW

Darren,

While we wait to order the CNC PWBs, I’m going to make my chassis. What are the dimensions of the board and the bolt holes?

Thanks.

–SSW

I want to thank everyone for being so patient. We have essentially had to wait twice as long since the carrier lost our first package.

The good news is that we have received the boards! We will be posting the link for purchasing on our website shortly. This will also run in the next issue of copper.

SSW- The board is 84mm x 69mm. The dimension of the screw holes from center to center is 77mm x 61.5mm. The screw holes are 4mm in diameter.

!!! I used the PDF’s from Skrodahl’s Muffsy CNC board a couple of weeks ago and thought it was close to 84mm x 68mm. (dang, I was only off by 1mm in the one direction)

But that means it’ll fit nicely in this case: https://www.jameco.com/webapp/wcs/stores/servlet/ProductDisplay?storeId=10001&langId=-1&catalogId=10001&productId=209358 which is sized primarily for the 4 year-old 12VDC TR 12-9 batteries out of my UPS 1500 MkII. http://www.batteryspec.com/cgi-bin/cart.cgi?action=link&product=33

Oh, and of course, I got a blue LED indicator to match all my PSA gear . . . . :slight_smile:

Darren,

Crickets on the other website. Can I call you and order a board?

Absolutely, I dont see why not! Call us and we can get a board out to you.

We are currently working on some of the logistics of posting the boards on our website so that anyone can order them. Future projects will be much smoother since we wont have to go through these steps again.

If anyone else has been following this forum and is interested in a board please let us know and we’ll help you out!

-Darren

If you’re looking for a power supply, this one comes with PDF’s and Gerbers: https://www.muffsy.com/blogs/post/Make-Your-Own-Muffsy-Power-Supply/

I would not use 9V batteries, since their capacity is fairly low. Forget to turn the power off, and they will be drained in a day. Also, you might get problems with headroom if the cartridge’s output is high, the gain is set to max and the batteries are a bit discharged. 12V SLA batteries are a much better choice.

Burson discrete op amps handle maximum +/-12V, take that into consideration if you want to use them.

Both the phono stage board and the power supply are 84 mm wide, both boards will fit perfectly in a B0905 cabinet and you won’t have to drill a single hole: https://www.muffsy.com/enclosure-and-ac-adapter.html

The power supply requires a 15-18V AC adapter, links to suitable adapters are also included in the page above.

For build instructions, even though the board offered from PS Audio is a bit different, I’d suggest having a look at these: https://www.muffsy.com/build-the-muffsy-pp-3-rev-a.html

phono preamp and power supply in B0905 enclosure

1 Like

Skrodahl, thanks! I’ve been monitoring your posts at Audiokarma.

Yes, I had two 12V SLA batteries sitting around that I’d replaced from my PSAudio 1500 UPS. 9AH should do the trick: http://www.batteryspec.com/cgi-bin/cart.cgi?action=link&product=33 Although they’d been sitting around for 3 years I was able to rejuvenate them with my battery desulphator and they indicate a 89% to 90% residual capacity after 72 hours of treatment.

Those batteries won’t fit in the B0905 cabinet, though, so I had to get something else: https://www.jameco.com/webapp/wcs/stores/servlet/ProductDisplay?storeId=10001&langId=-1&catalogId=10001&productId=18877 I’ll rig up a pair of 2.1 mm power jacks and a switch shield such that the power to the CNC board must be turned off in order to insert the plugs to charge the batteries. What is the power draw of the CNC board with the IC op-amps? I’d think with 9AH of available energy it should run the CNC for a long time. If anything the batteries will probably self-discharge at a higher rate just by sitting on the shelf . . .

I’m looking forward to it.

–SSW

What is the power draw of the CNC board with the IC op-amps?
The CNC board, depending on the choice of op amps, will draw 20-40 mA. Add whatever your LED draws if you use one to show if your preamp is powered on. I run high intensity LEDs at < 1 mA, ordinary LEDs can draw up to 20 mA.

Since ordinary 9V batteries are only about 500 mAh, you’ll get some 30 hours and change from them. Half if your LED runs at 20 mA.

2x9 volts can, as I said, be close to the limit where certain setups clip. 2x12 volts is enough, and 2x15 volts is just because it’s possible :slight_smile: Here’s how to modify the PSU to other voltages: PSU Output Voltage | Muffsy Phono Kits


I just read the article in the latest Copper about some “challenges” with Vinyl, and wanted to share something about how to keep the noise floor as low as possible. The solution is quite simple. Use low noise op amps with JFET inputs. MM cartridges are sensitive to current noise because of their high impedance. Do experiment with other op amps, but keep something like the OPA2134 in the first gain stage.

MC cartridges are another can of worms, since the signal usually is 1/10th of what an MM provides. They are sensitive to pretty much anything except (or more correctly, least sensitive to) current noise, so a very low noise op amp with BJT inputs is needed (or a discrete design using BJT transistors).

This means that the CNC will never do a good job for MC cartridges, even if you up the gain. And it’s also why you should be skeptic of combined MM/MC preamps that share the same input stage, as it will most probably be poorly suited for either MM or MC (or, often, poorly suited for both of them).

Hence the recommendation in the last Copper magazine to use OPA2134 in the first stage, and a LM4562 in position 2. And then I’m spoiling myself and buying some PRP resistors for good measure . . . :slight_smile:

1 Like

The PRPs sure look cool :slight_smile:

I go through Multicomp MF25s like they’re candy, it would be cool to see if there’s any sonic differences. I have been collecting old Tesla precision resistors, but I never find all the correct values…

Darren and Skrodahl,

My PRP’s finally arrived today, so I can start building. Before I do, can you please confirm that the DIP switches are to be installed per the attached photo? The switches Skrodahl uses aren’t the same ones ordered from DigiKey, but I think the “o” on the twin DIP means ‘off’ and should be facing the side of the board that has the “Gain” table (Right channel circuitry)

The 4-pin DIPs were pretty obvious, as that clearly stated the “off” side of the switch, but the 2-pins were a bit confusing.DSC_0427.JPG