Hey all!
Many of you had helped me track down a ‘ground loop’ buzz I was having in my refurbished Adcom GFA555 amp. The buzz, was a two fold issue as it turns out!
One part was that the new inputs for the amp were not properly grounded!
So thanks to Paul and you all, I did the proper sequence listed by McGowan and found the Amp itself was making a loop…AND, the PS Audio Pre-Amp was ALSO making a buzz!!!
I hadn’t noticed, but the Pre-Amp when you plug it into an outlet, you can hear an audible ‘buzz’ from the transformer box. When attached to any amplifier, you will hear a ‘buzz’ in the speakers (low volume).
In assuming ‘well maybe the capacitors have worn out and they aren’t smoothing properly’, upon opening the case, I could see that there is a resistor (unknown value to me) that looks broken/blown a little? It doesn’t look burnt, but broken apart. Everything else ‘looks’ fine.
Would love to know the actual proper types and values of the Capacitors, the resistor, and the bridge rectifier to see about rebuilding it?
HA! Well there may not be a whole lot to follow! My step father had gone thru and re-capped the actual pre-amp itself I think 5-6 years ago? The only thing he didn’t do (or think was needed) was inspecting and testing the power supply unit! But follow on! Hopefully I’ll get some good answers from former…or maybe current owners!
I actually just finished restoring my M-500, replacing the mains cable with a fused and switched IEC socket and some dent removal and reinforcement for the case as it had been dropped at some point.
That resistor is a 6.5K ohm for driving the LED off of one of the 28v rails. Here’s a schematic of my unit which is slightly different from yours as it’s powering the LED from the +28v rail. Double check your bridge rectifier orientation to be sure.
OH MY GOD THANK YOU FOR THIS! And yes I am yelling because I’m a numbskull for not realizing that was so simple!!! I was starting to think it was for impedance or something, smoothing or something. But no. It’s a drop down resistor for the LED!!! I’ll order a 6.5k ohm resistors. Is there a wattage I should look for? 1watt? 5watt?
I can’t thank you enough for the diagram as well! It looks effectively the same as mine. I’ll double check the rectifier orientation as well.
Can I ask you a couple more questions if you have time?
The reasons I checked on the power supply was due to the unit itself making a slight “buzz” sound when plugged in. Nothing felt loose at all. I haven’t removed anything other than the resistor, so I’m not certain how the two capacitors are or the bridge rectifier other than continuity. Does yours make a slight buzz?
I think mine is a 1 watt part which is overkill for the LED but no harm going bigger. The caps are for EMI filtering and are 1uf at 250v non polarized.
I would also recommend strapping the earth ground to the chassis for safety as it’s floating by default. This wasn’t yet done in my picture below, but I simply screwed it down on to the transformer mounting bolts. I also had to flip the transformer 180 degrees as the secondary leads were to short after I disconnected them for the repair.
What’s unique about the M-500 is it delivers to 28vdc rails when then get passed through another bridge inside the preamp - strange! The stock M-250 is 2x28vac.
My unit doesn’t buzz at all. You might try tightening the four screws holding the bracket to the core and see if that helps. I also added a 5x5x0.25 inch aluminum plate to reinforce the case as mine was dropped at some point and the flimsy box bent in numerous places. I would recommend doing this for strength and it might just damp any core buzz you might have.
Awesome work on the reinforcing! That was smart!!! Thank you so much with helping with this. The Preamp was my step fathers, who had re-capped the whole thing a number of years ago and then passed to me, so I’d love to keep it in proper kit and function.
It’s suppose to rain up here in the NW so I’ll get to the bench tomorrow and start work on the power supply and send you a video clip of the buzz, just to get your thoughts. I’ll check the bolts and such, and also think about maybe some thin rubber isolation dots under it to lift from the metal case? I’ll also be sure to double check the grounding.
Thank you again so much. This is SO HELPFUL FOR ME!!!
I’ll be working on my 4.6 preamp this weekend. Just recapped it to try and eliminate some distortion in the left channel but that didn’t fix it, so I’m attacking the transistors and diodes next. Found some NOS original spec BJTs for a good price so decided to just swap out ALL the transistors. I could be more targeted in my troubleshooting but I really enjoy the process so I’m just going for it!
I would love to get a 5.5 - how do you like it? Share a pic of the internals if you get a chance!
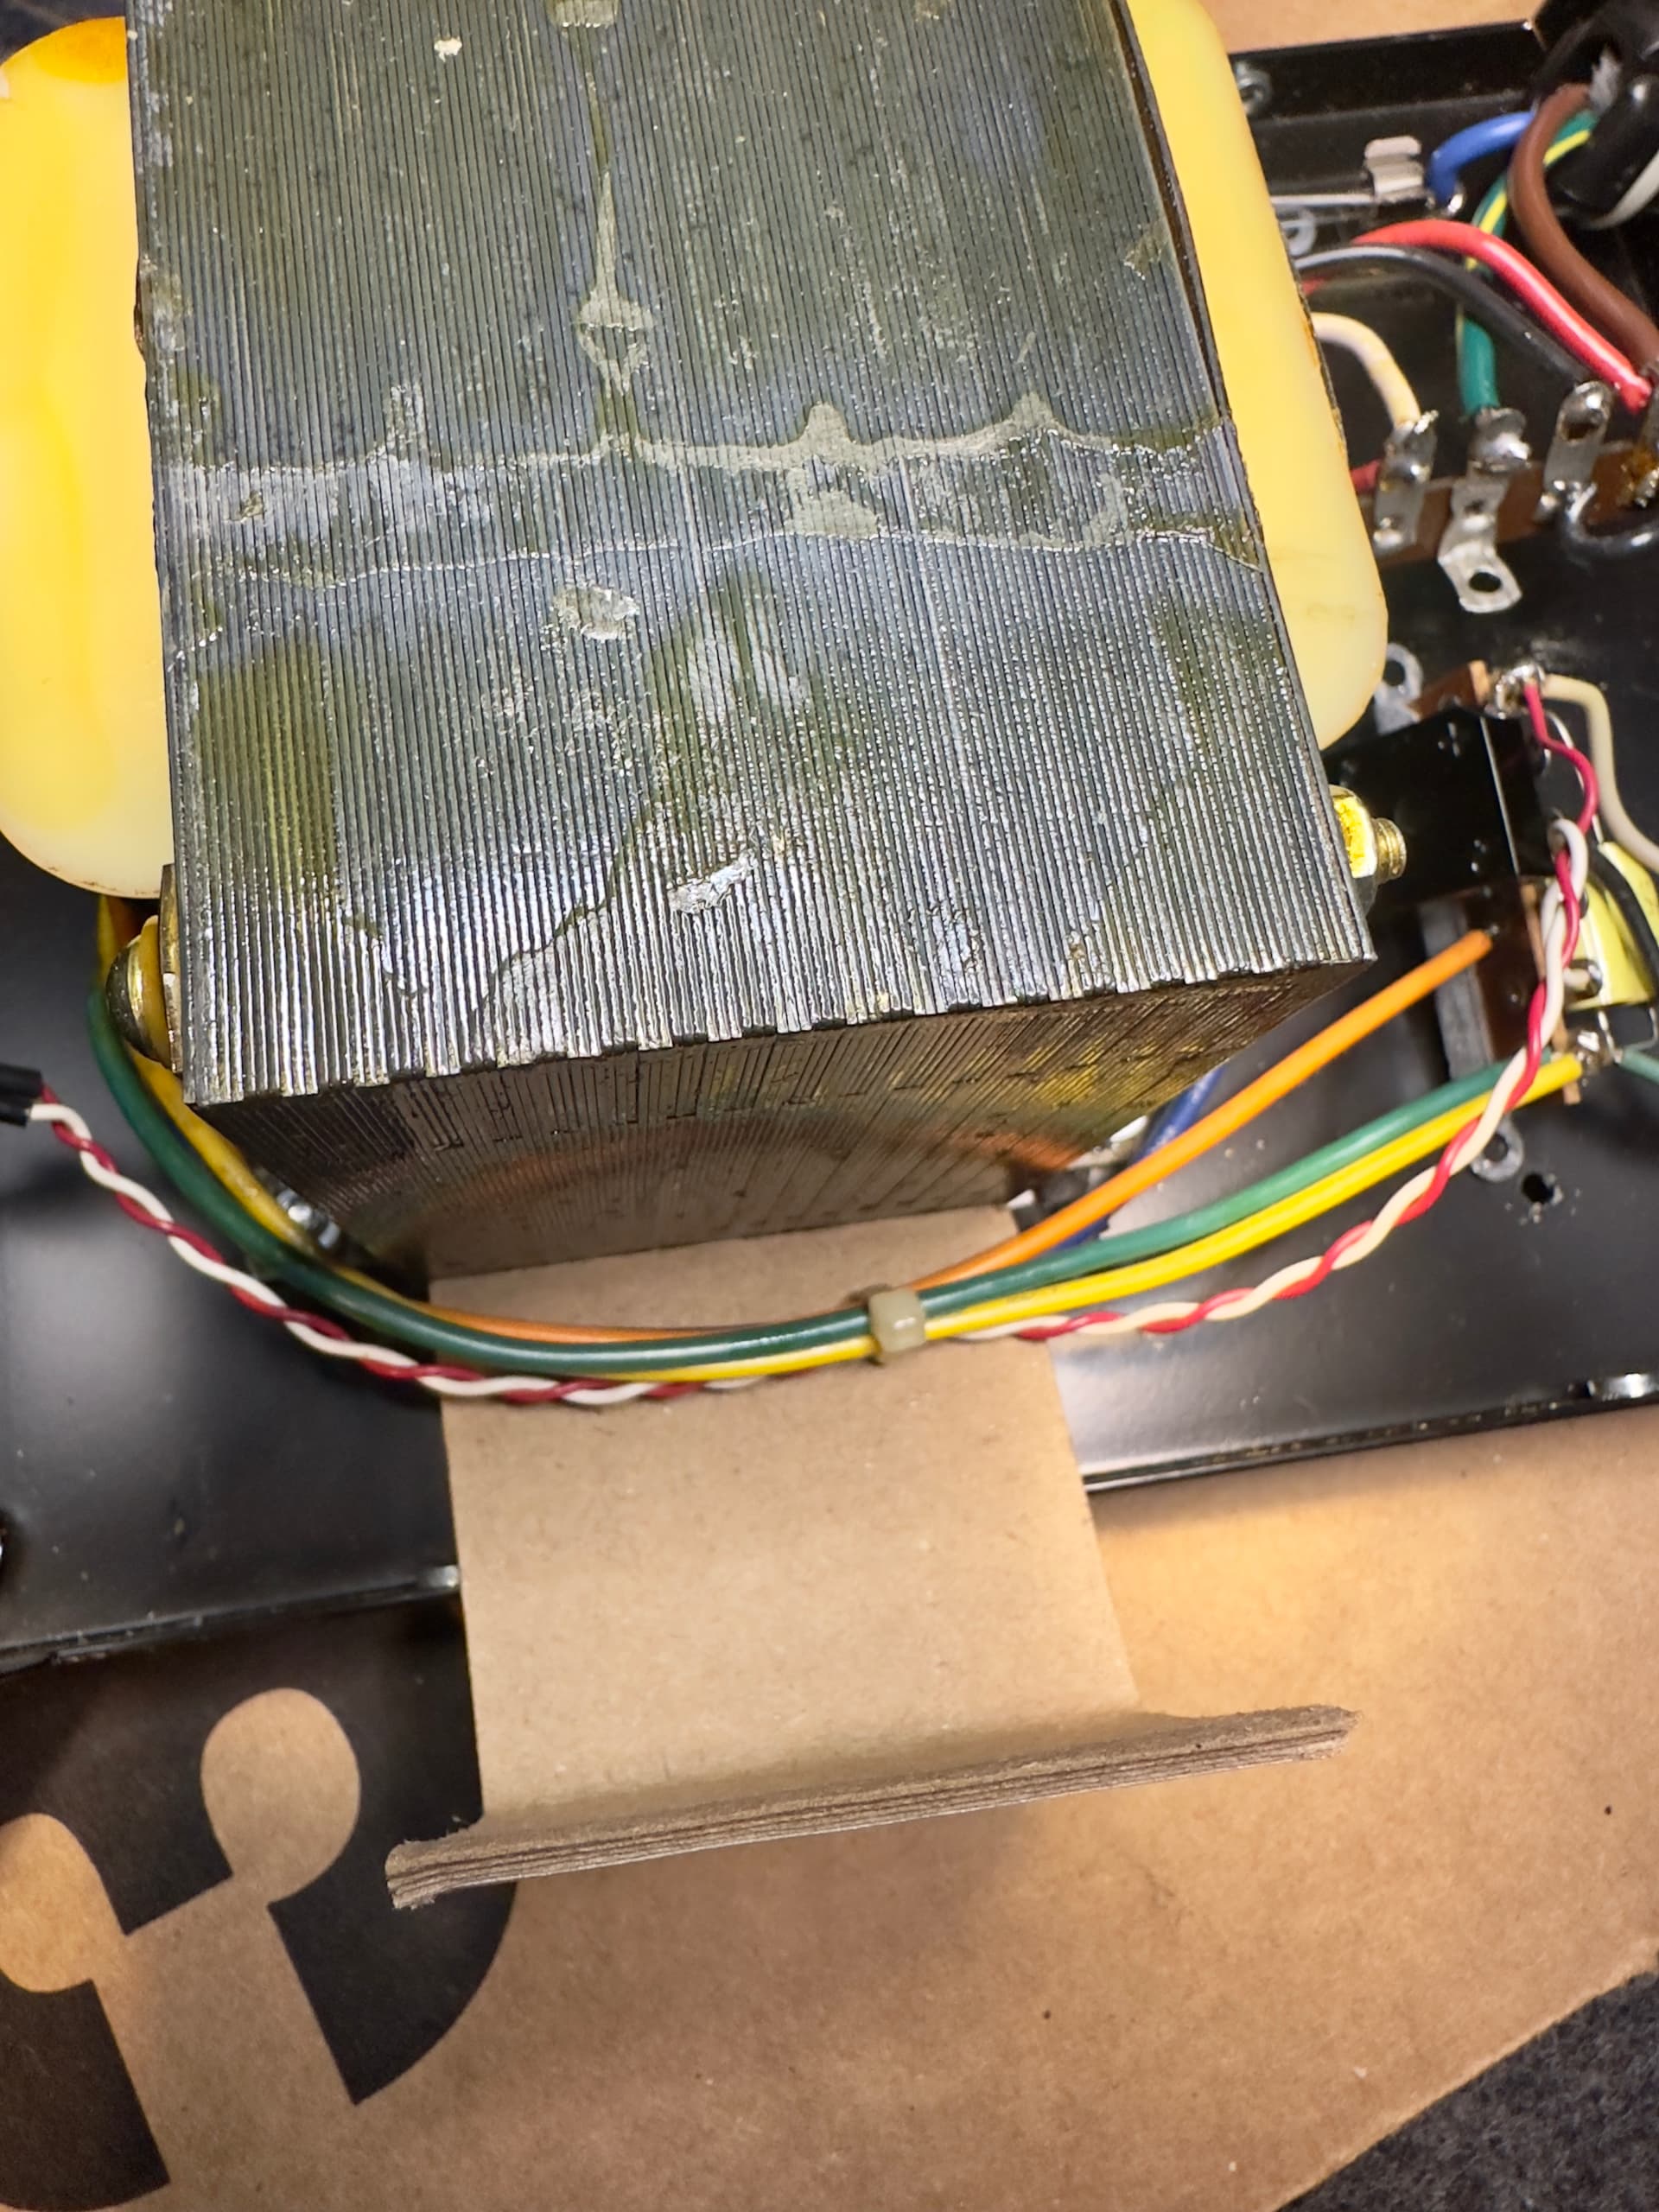
I may have just found the source of your buzzing. Looks like one of the transformer core plates has deformed and pulled away a bit, which could definitely make a buzzing noise. To fix it, I would squirt some good adhesive into the void and clamp it down with a couple of c clamps overnight to remove that gap.
You sir have a VERY keen eye!! i didnt notice that!!! I tried to squeeze it, to no success. HOWEVER! I did discover that the transformer is actually angled and bent in the bracket a little bit! I am going to remove now and try bending the bracket back properly flat; and adding some cardboard or thin rubber if i have it under the transformer to isolate from the metal box. I’ll report back!
The new resistors come in in a few more days but I think I can power it on without the led attached.
Can’t get cardboard under there with current screw length, but I’ll try this for now and see how the hum/buzz might be. If it’s still there by mechanical vibration I’ll get longer machine screws and put these perfect sized cardboard corners.
Did you try a c clamp to try and pull that core back in? All of that glue is there to prevent mechanical vibration so worth putting some time on the core and brackets for sure.
That transformer is heavy so would definitely make sure it’s secure in the case - or be sure to never bump or drop it!!
Morning! I’m down in Oregon, so well aware of the storms. Oh my god there was a lightning bolt just a few blocks over that scared the whits out of me. Was insanely bright blue-cyan and BA-BOOM!!! So spending the day in the basement working on audio gear was perfect.
I did try doing a little c-clamp action, but as I closed the clamp I could hear micro-crunching…and looking very close it looked like it was manufactured with that little buckle as there was the potting glue in the crease. So I thought safer to leave it, and work on securing the base and brackets more first to see what that remedied.
Well, the little bit of anti-skid rubber mat, and straightening the L-brackets, and adding thin rubber washers FIXED THE BUZZ HUM!!! It is dead quiet and works like a champ!!! I’ll put the new resistor for the LED in there when it shows in a few days and do one last double check.
Your re-capping work looks amazing!!! Can you speak a bit about what you are choosing and why? Did you say you are replacing the transistors as well? Are you doing matching?
My step father re-capped this a number of years ago with what I assume are direct same brand replacements. Are you changing any values? I’ll attach some pics from last time it was opened
Does your unit have any heat over near the phono-section? I don’t have any vinyl, so I never use it but I have noticed that’s where “some heat” comes out of the top.
I did some A-B comparisons with a rare short run “Amherst Audio P-2000” pre amp (experimental run by Steve Kaiser from B&K electronics). The PS Audio is incredible with sound stage width and very clean. I can barely pick ANY difference in using gain or straight wire. The Amherst pre-amp though, had more gain to it, and much stronger central focus and “projected” a bit better. The sound stage was narrower, but I liked the very taunt focus and projections of where instruments were. One song had a drum kit dead center with toms a bit off center left right with the Amherst. With the PS Audio, the drum kit was off to the right a bit, and didn’t have the focus or depth.
Do you happen to know anything I can check and test with the Pre-amp? Any improvements/updates? I have a cheapo Chinese oscilloscope that I’m learned to use and this “looks” like it can be easy to lean on and upgrade
Wow, thanks for sharing those pictures! That is a beautiful piece. Your step father did a thorough job! The 5.5 was the pinnacle of the line at the same time as my 4.6 and it is overbuilt to an obscene level (of course in a good way!). I’ve never seen detailed shots of the inside of it, Notably, it appears to have no fewer that 6 NPD5565 JFET pairs, where as mine only has 2 at the front end of the phono section. That’s very cool. I’m guessing the heat your feeling over the phono section are those 6 large power transistors in TO-220 packages. Not sure what they’re doing, but I’m guessing they’re providing extra power regulation for each stage/channel. That would follow the overbuilt ethos!
Honestly there’s nothing I would do to that piece, given its heritage. If I were to do something, I’d give the circuit board a good clean with some IPA, and maybe replace the RIAA stage caps with a set of WIMA 5% film caps - that could be a nice upgrade! I actually just ordered some of these:
0.022uf 630v (WIMA Part Number: FKP1J022205D00JSSD)
0.068uf 630v (WIMA Part Number: MKP1J026805B00JSSD)
The work on my 4.6 is to get rid of some distortion in the left channel of the phono section. I found a supply of NOS BJTs so I thought why not! I really love the AMP and want it to be tip-top! I’m planning on repainting the case as well as soon as the weather get’s better. It’ll look mint, which I like!
Wow, thanks from me too. It’s been years since I looked at one of these. We have several in the museum but I’ve not had a look. I remember the decision to go with those long extensions to the rotary switches to keep things clean and noise-free—that way, the signals didn’t have to travel from the rear panel up to the front to be selected, then all the way back again to be amplified. Good memories.
Aaawww you’re super welcome Paul!! Thanks for jumping in! This really is a spectacular Pre. It was one of my step dad’s pride and joy components, and drove into a Musical Concepts ADCOM GFA-555 and those drove a pair of Vandersteen 2cs in his open loft sound system. Dad recapped this a few years ago, and last year I re-did the ADCOM, and got both for my system! You really made some damn great stuff back in the day!!!
Thanks to you and your crew for being awesome and teaching folks about audio; music, and electronics!! Best wishes to you all
Also those rotary switches are AWESOME!!! I think I learned enough to know that they helped to keep signal paths as short as possible. Personally, I love the industrial “knobfeel” as they say!
Thanks for the great info! I wish I had a turntable to take advantage of the phono capabilities of the Pre. For all of the transistors that this has (all original from what I recall) they are dead quiet. They may not be high gain, but man they are clean! With the High Level chosen I can barely hear any hiss at the tweeter ear right next to it. Compared to my other Amherst Pre; which is a noticeable hiss if you just casually pass your head by the tweeter.