Well, I was wondering where I was going to post this. Thank you for starting this thread.
My DMP recently stopped loading blu-rays and began to only recognize the Redbook layer on hybrid-SACDs. This has happened in the past and cleaning the lens had always resolved the problem. In this case cleaning the lens resulted in no improvement. Over a period of a few days the problem worsened and soon Redbook CDs stopped loading. The only media that would play was single-layer SACDs. The DMP is based on an Oppo BDT-101. I’ve had the almost identical problem with my Oppo BDP-83SE twice before and in both cases replacing the laser assembly completely restored the player’s function. The inexpensive Chinese lasers used in Oppos are essentially consumable items and will fail. Fortunately, they are used in a wide range of optical players and they are readily available and easy to install.
When your DMP’s laser dies (and it will), here’s how to fix it. This is a modified version of my guide for fixing the BDP-83SE .
You’ll need a new KEM480AAA laser. These can be found for around $8 to $10 (though many sellers are delighted to charge much, much more) and may even come with the entire transport mechanism.
If you have an anti-static strap, wear it while doing this if it makes you feel better. I just shot myself with my Zerostat and went for it.
Be aware that I made this up on the fly. Your results may vary from mine and following these instructions may result in complete destruction of your equipment, blindness, electrocution, and the untimely demise of any small pets nearby. Proceed with caution. Consider having a small cup on hand to keep the collection of screws you’ll be removing from running away or being ingested by those small pets.
If you have a disc loaded in the unit, remove it and close the tray. Turn off the unit and unplug all cables.
Turn the unit upside down on a soft surface taking care to not scratch the glossy top. Using a Philips screwdriver, remove the four screws from the bottom of the unit that restrain the cover. Grasping the unit firmly by the sides and leaving the cover free, slowly lift up. The cover should slide free of the case and remain on the work surface.

Turn the unit upright and place in a well-lit location.
Before you open the unit, take this opportunity to do a bit of house cleaning and remove accumulated dust and debris in the unit. Giotto rocket bulbs work great for this.

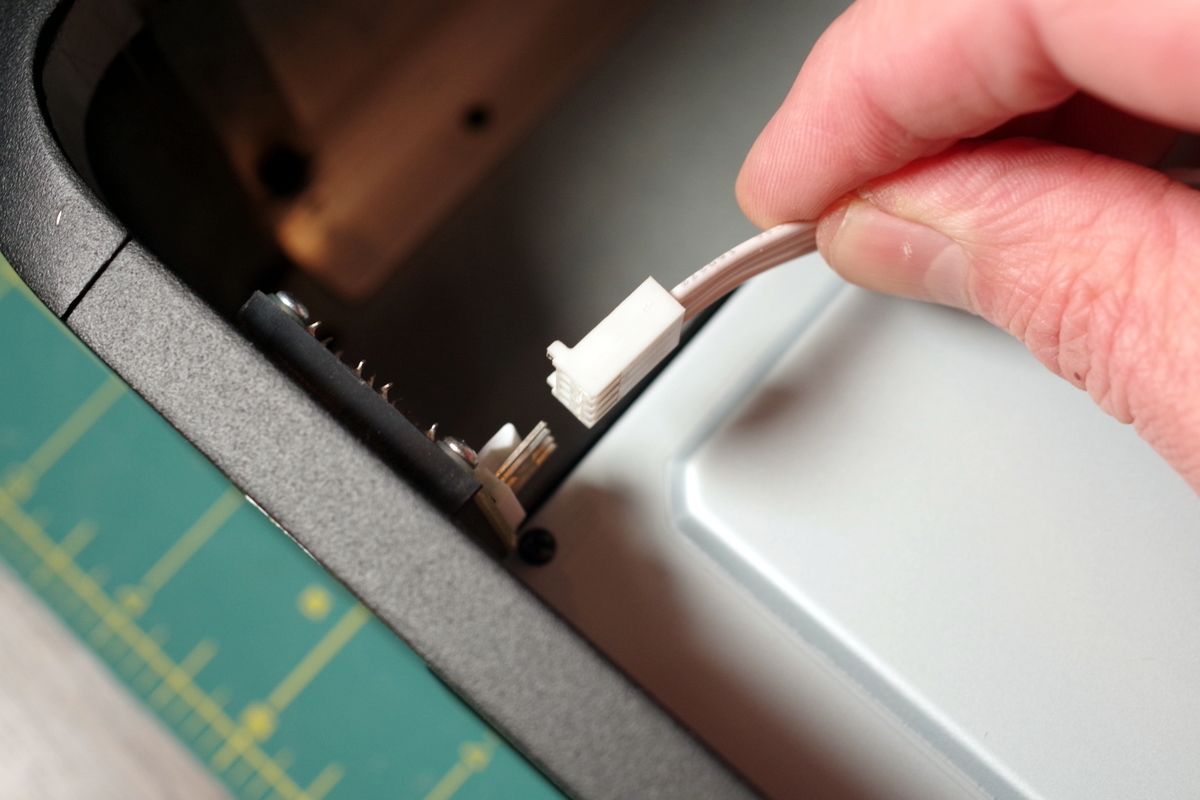
Unclip the lighted logo cable.


Remove the six small black screws on the top of the disc mechanism.

Use a small screwdriver to free the back edge of the cover from the transport chassis.


Lift the rear of the cover and carefully remove the front edge from between the transport chassis and the unit’s case.
Verify the laser you bought appears to be the same as the one in your player. The numbers on the boards on my replacement were the same as those on the original laser.

Push the sled as far towards the back of the unit as it will go.

Gently lift the dark-grey clip that holds the sled’s ribbon cable up to release the cable.


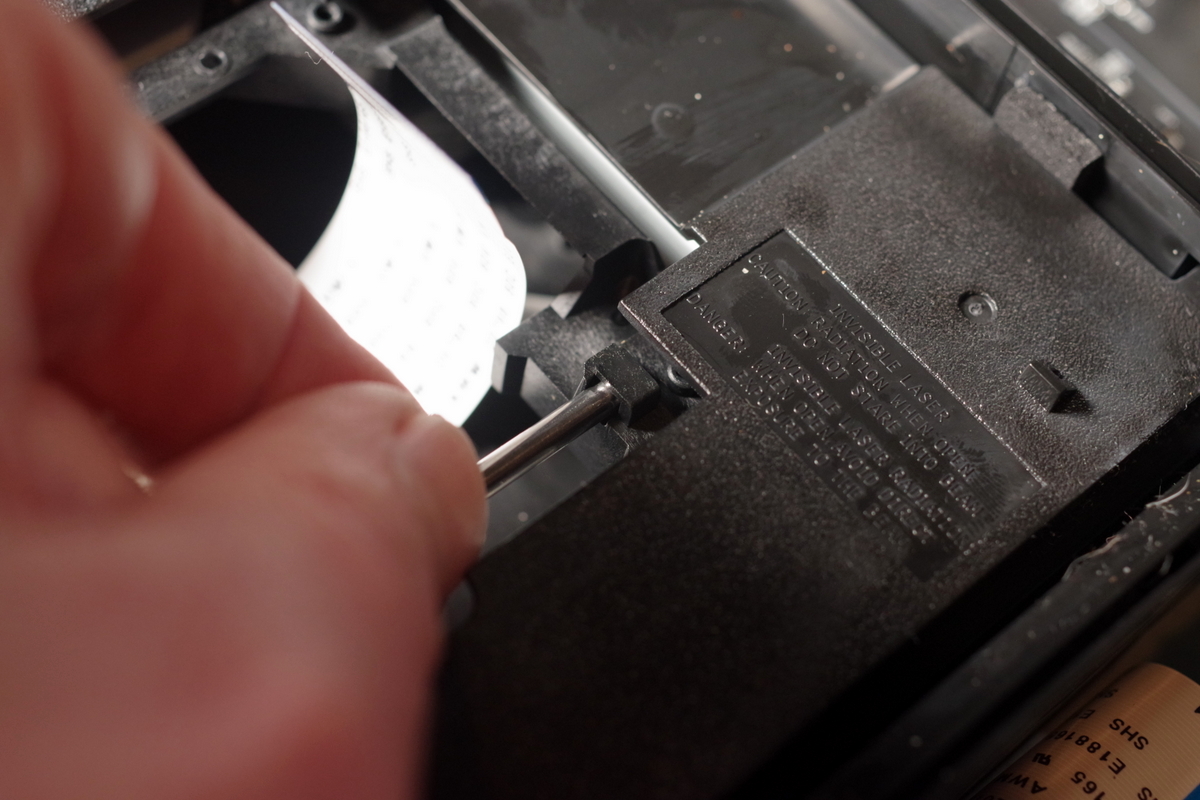
Find the white plastic clip on the right rear side of the disc mechanism. The clip secures the laser assembly to the black plastic rail. Carefully pry the clip free using a small screwdriver.

Remove the two black screws that secure the drive stabilizer and lift the stabilizer free of the transport.


Using a small screwdriver, push down on the spring clip that locks the metal rail in place. There isn’t much keeping this spring from leaping free of the unit and flying across the room, so be careful when you do this. If the spring does become detached, it’s easy to put back into place provided you don’t lose it.


Pull the rail towards the front of the unit to slide it out free of the rear plastic clip then push the rail backwards to free it of the front clip. Lift the white retraining clip free of the worm gear and gently remove the metal rail and laser assembly from the unit.
Remove the white plastic clip that connects to the worm gear. It is secured with a tiny, easy-to-lose screw and two, delicate plastic posts.

Remove the rail from the sled noting how it passes over a ribbon cable.

Install the rail in the new sled and reinstall the white worm gear clip taking care to position it over the two plastic posts.
Remove any dust and debris from the rails and worm gear.
Reinstall the sled by first positioning the white plastic clip on the worm gear.
Next insert the metal rail in the front clip by lifting the rear part of the spring clip over the rail, sliding the rail through the hole in the plastic frame to allow the end of the rail to move past the spring.

Slip the other end of the rail into the rear plastic clip. At the front clip, push the front of the spring clip down and back to lock it under the plastic frame and secure the rail.

Reinstall the white retaining clip on the black plastic rail.

Insert the ribbon cable into the slot on the sled as far as possible and close the retaining clip. Make sure the cable appears to be straight.


Use a micro-fiber cloth (or Q-tip) to gently remove any debris from the lens.

Replace the disc stabilizer and replace the two retaining screws. There is a black plastic pin on either side that helps position the stabilizer.


Put the disc mechanism cover back into place. You can identify the rear of the cover as its screw holes are closer to the edge than those in front. You’ll have to work the front tab between the transport and the unit’s case. Replace the six retaining screws.


Reattach the lighted logo cable.

Replace the unit’s external cover.
My player now immediately sees the SACD layer on hybrid discs when I load them and plays BDs without complaint. Good luck with yours and consider stocking up on lasers.
While you’ve got the case open, you might install a new IR extender, too.